2007-01-10
[MyGame]MyGame で実装する「THE APPLE CATCHER」(2)

実装のポイントを簡単に解説。
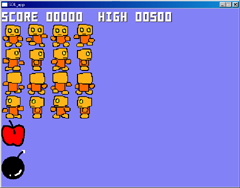
以下はシーンクラスを使った画像表示の例。
#!ruby -Ks
require 'mygame/boot'

# ゲームシーン
class GameScene < Scene::Base
  # 初期化処理(シーン生成時に呼ばれる)
  def init
    # 背景色の設定
    MyGame.background_color = [128, 128, 240]
    # デフォルト ttf と表示サイズを変更
    Font.setup_default_setting("fonts/boxfont2.ttf", 40)

    @font   = ShadowFont.new("SCORE -----  HIGH -----")
    @player = TransparentImage.new("images/player.png", :x => 0, :y =>  40)
    @apple  = TransparentImage.new("images/apple.png",  :x => 0, :y => 300)
    @bomb   = TransparentImage.new("images/bomb.png" ,  :x => 0, :y => 380)
    @tasks  = [@player, @apple, @bomb, @font].flatten

    $highscore ||= 500
    @score = 0
  end

  # 終了処理(シーン終了時に呼ばれる)
  def quit
  end

  # 更新処理(毎フレーム呼ばれる)
  def update
    @font.string = "SCORE %05d  HIGH %05d" % [@score, $highscore]
    @tasks.each {|e| e.update }
  end

  # 描画処理(毎フレーム呼ばれる)
  def render
    @tasks.each {|e| e.render }
  end
end

Scene.main_loop GameScene
init の中で描画オブジェクトを生成している。 描画クラスには次のようなものがある。
- Image …… 画像描画クラス
- TransparentImage …… 透明色扱う画像描画クラス
- Font …… フォント描画クラス
- ShadowFont …… 影付きフォントの描画クラス
生成したオブジェクトの draw メソッドを呼び出すとスクリーンに描画される。
Scene::Base はシーンを簡易フレームワーク的に扱うクラスである。 シーンオブジェクトの中で以下のようにして次のシーンクラスをセットするとシーンが遷移する。
self.next_scene = FooScene
追記(2007年3月31日):最新の MyGame に合わせてサンプルと解説を修正。